
A microforest garden is usually something you would design for small-space forest gardens – for urban situations, or areas where space is at a premium. However they translate into larger forest garden designs as a nucleus forest garden, and can be a great way of starting a larger forest garden too.
To quote Dave Jacke: Technically, a forest is a large area of trees with interlocking crowns, and most forest gardens will not achieve the size and density to meet this guildeline. But we can still apply forest-gardening principles to very small spaces with one, two or three trees.
Recently at Milkwood Farm, Dan Harris Pascal led the design and implementation of a microforest garden as part of an Edible Forest Gardens design course, and now we have a kick-ass micro forest garden right outside the woolshed.

When designing a microforest garden, it would be best to include guilds of nectary and soil-building plants when possible, as wel as numerous high-value crops. Ideally, each plant will perform multiple functions to maximize the yields and health of the miniature ecosystem, and the plants will together serve as resource-sharing and mutual support guilds. (Dave Jacke again)
I’ll let Harris take this conversation from here, as he can explain it best:
“So the basic pattern for the design was a micro-forest garden, with the aim for this garden also being a ‘nuclei’ planting, so that this garden can grow up plants for us to use around the woolshed and in other sites on Milkwood.
Also, I wanted to create a small scale demonstration of the principles of Forest Gardening because it is more accessible to people living in urban / suburban environments and easier to understand on the small scale rather than being overwhelmed by too many plants.
Site considerations / design parameters / thoughts:
– this space is by the woolshed and in a high traffic area between the camp-fire, shower block and road to the market garden etc.
– The main circle bed was created last season to break up flow from the runoff from the road above the woolshed but hadn’t yet been designed or planted. The central circle was ~6m in diameter and so a good fit for a backyard planting.
– This site is rocky and on a ridge, commonly in this landscape wild plums can be found growing in these environments. This was an indicator that green gage plums would be perfect here!
Plums need cross pollination for higher yields so it was decided that we would plant into the road side bed and divide it up to make it easier to access. This would also let us demonstrate keyhole paths as a method of providing access to trees for pruning / harvesting, etc without sacrificing too much space.
This site has high flows from uphill runoff water (when there’s heavy rain, which is not often) so I wanted to demonstrate methods of rain-water harvesting. The access paths of the microforest garden were lowered by 10cm and leveled all around so that the garden can fill up in a heavy flow before spilling out of the side into the roadside garden bed and then out down the hill.

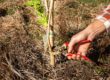
Forest Garden interns Kel and Minoru helping Harris ensure the floodable paths are on the level

Testing the level with water. Inflow during heavy rain comes from uphill to the right


Gravel time! The paths were designed to be 60cm wide at the base to ensure easy wheelbarrow + foot access…

Classtime outside the woolshed, prior to students designing the microforest garden

Design food! Parmesan cookies with Milkwood red onion jam.


Milkwood forest garden – blooming despite a long dry winter, thanks to good planning and design
With three green gage plums selected, students were asked to design guilds to support the needs of the green gages. Green gages need: protection from pests, pollination, available nutrients, protection from grasses.
Available plants were selected for these needs during the course. Common patterns from the various student group designs were:
> using acacias, albizia and clover to fix nitrogen in the soil food web to feed the tree.
> using banksia and grevillia to mine phosphorus in the soil and support beneficial insects and birds for pest control
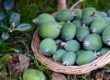
> using feijoa for pollinator support and to stack a smaller fruit producing tree in the understory
> using comfrey to mine and cycle nutrients from the deeper soils and generate mulch
> using yarrow to cycle nutrients, support pollinators and exclude grasses
> using mint to provide aromatic protection from pests, support pollinators with its flowers and grow herbs for mixing in the summer with market garden watermelons
> using oregano as a ground cover, pollinator support and useful kitchen herb.
> using rhubarb to provide more delicious edibles (great stewed with plums), dig down with its tap-root and generate mulch.
> using strawberry as a ground cover, fruiting plant in the herb layer and as pollinator support
> planting an elderberry hedge to block winds from the east (woolshed is blocking from the west) and support pollinators
> planting pigface to support pollinators and grow as a ground cover.
> using Iris to provide flowers for asthetics and define the borders
Having selected all the plants in the mutual support guild it was time to place them into polycultures. You don’t want to grow two plants with the same form in the same bed as they can compete rather than cooperate. By selecting plants with different forms we can design to minimize competition, and maximise abundance.”

Design time…


The central circle provided the perfect place to demonstrate these principles and the functions that the plants provide.
After siting the main trees, students selected combinations of running and clumping herbs that could fulfill the required functions. And then it was time to implement – planting time!

I’ll leave the implementation photos for another day – but it’s looking truly amazing…
Upcoming Edible Forest Garden Courses include an Urban Forest Garden Design course with Harris in December, and a series of short and intensive courses with Dave Jacke in Sydney, Melbourne and Milkwood Farm in March. Join us if you can!


One thing I can appreciate about living on acreage, are those cleverly designed smaller areas which tend to be far more productive than the surrounding acreage.
I could see a lot of people with suburban backyards, being able to adapt it easily. Although I must say, circles are only really useful on flat land. On slopes, it can only ever be the boring rectangles. We’re generally stuck with rectangles.
At least you can have rectangles on contour Chris, which is not so boring. I’m one who lives on a steep hill …. have done a dome garden on a bit of my hill but it has taken years of building up walls and then has become harder to move the chook dome. Contour gardens are great though and the paths collect rain on the rare event we get it. XXX
Do you have another variety of plum nearby to pollinate your Green Gage plums? They do have a reputation for being partially self fertile, but I know some people have had problems with pollination when planting only the one variety – you will get a much better crop if you throw another variety into the mix!
Also, Green Gage have a tendency to produce a much lighter crop every second year (biennial), so you will get a more reliable harvest of fruit from year to year if you have another variety there to compensate – diversity!!
Oh I can sympathise with you on the sloped ground issue. We have medium to steep hilly country here… and I have lots of rectangles.
However, I have gotten sick of those and I have now made some tiers with circular raised beds on them with paths of switch-backs in between. Think of the graceful curves of the switch-back roads you see in mountain regions and you can get really creative when you think of the potential garden spaces in between!
Reblogged this on X_trous Notes and commented:
I want an internship too… ~_~